Archiving S4 League: A Case Study
A Guide to Analyzing the Quality of Archived Content
by hikosan (08-May-2026)
This article has been edited (view changes)
10-May-2026:
- Added information about using "Sonic Visualiser" in "Chapter V: Audio Quality" (jump)
Table of Contents
- Introduction
- Part I: General Archiving Tips
- Part II: Naming Conventions
- Part III: Image Quality
- Part IV: Video Quality
- Part V: Audio Quality
- Conclusion
Introduction
There is a lot of content on the internet. And we're used to hearing that "internet does not forget", i.e. everything lives on the internet forever once it is on there. In reality, this is far from being true. One part of me is actually happy about that. On the other hand, there is media that is at risk being lost. Yes, some machines might still store the data, but it won't ever be available to you, and it will never be found ever again once it is gone from the client's end.
One of such media are video games. Especially online video games, clients of which you must download in order to play them (in contrast with the browser-based ones). There are hundreds or thousands of players who can download, say, the beta version of the game's client, so you might think that it would totally be preserved and available on the internet at all times, perhaps directly provided by the official game's publisher for the next--what would feel like--forever; and then you'd think "surely, someone would have enough time to populate the internet with copies". That sounds cute. And if that was the case, I wouldn't have been wasting my time writing this article.
Instead, we're too careless, and we are most regretful when it comes to our attention. Who would've thought that I'd be spending my time trying to archive one of the games I played in the past, which is not even my favorite online video game? Yeah, that's what happened. This article is about some things I want--not just future archivists, but everyone--to be aware of in order to preserve the necessary data associated with the media of choice (not necessarily video games--it could as well be art, music, literature, etc.), especially in the highest quality possible.
Part I: General Archiving Tips
The first thing I want you to keep in mind: what you have now might be lost tomorrow. This is to say that if it's possible to NOT delete what you have downloaded (e.g., early game installer; or early version of the software that does not have mirrors, or has very few mirrors), then please consider keeping it. Another very important thing is to have multiple backups of data, if you can afford doing so. I am currently not in possession of an expensive storage setup with an array of hard drives, but even a single 1TB drive still does the job, especially when the efforts are combined with other enthusiasts.
I am not going to give advice on which storage to buy (you might read this article in the future where the recommendations might be outdated), you'll have to research it on your own, I will simply give you pointers. For example, look into NAS and optical disks for archival purposes, if you want to take this to the next step. If you want a budget solution, then seek advice on the r/DataHoarder subreddit, or read this article on Archive Team's wiki. Tools and some other useful information can also be found here, here, and here.
Another very important thing to keep in mind: link rot. As I already said, you might have a link to some data hosted on a cloud service, but there is a very high risk of it being gone any moment. If it's possible to download--please, do. Do not leave it for later if you have enough storage space. If you don't have storage space, please consider letting other people know about it, and let them download. This might sound obvious, but sadly, it's a very common practice among preservation enthusiasts to gatekeep content. They feel special having something that is not owned by others. I understand. That does feel nice, indeed. But, say, the very reason you have it in the first place is because someone else cared to share.
Remember: sharing is caring. This project would've failed if not for the people who decided to share what they happened to have, and those who re-uploaded things from official websites to forums or blogs or other websites. For example, a Naver user under the name multiplegoer has posted what would be one of the only surviving screenshots of the 2007 CBT (Closed Beta Test) client of S4 League:

Last but not least, do NOT use AI to modify the files, be it images or audio or video. Do NOT attempt to upscale, enhance, photoshop, optimize, compress, crop, cut, or anything, at least without preserving the ORIGINAL unmodified, untouched file. You will understand the reason in the following parts of this article.
Part II: Naming Conventions
You want to preserve every file, of any quality, of every resolution, even if it's a "duplicate". Preserve first, sort and analyze later. When sorting the files, I am using naming conventions to better understand their nature (it might be subject to change), and it generally goes like this: "[game name abbreviation]_[unique filename]_[number/dimensions]_[additional info]".
For example: s4_og_300_video.png. Explanation:
- s4 - short for "s4 league".
- og - original (the game comes in different Seasons, each of which have a different version of the original logo; e.g., the final version of the logo is blue).
- 300 - the image has a resolution 300x300, which is WIDTHxHEIGHT, and 300 in this case is the first value WIDTH.
- video - after some analysis, I found the image was cut from one of the game trailer videos. It might not be valuable, but I keep it just because it's a miserable 87.5 KB file.
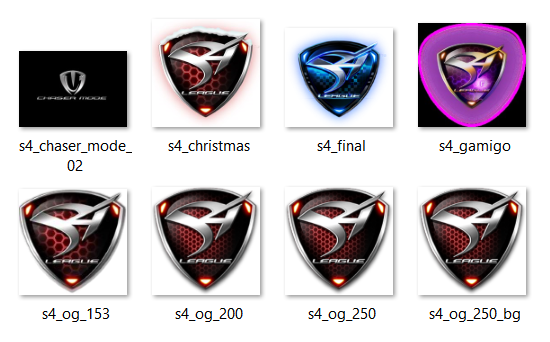
As you can see, I did not clutter certain filenames with information about dimensions, and no additional description was needed because there are no other versions of such files [that I have found], so I rather keep it simple. I also don't know which of the "og" logos is the "truly" original one, i.e. an official asset and not a modified one (resized, upscaled, compressed, etc.), so for the time being I will keep all of them, neatly organized.
Note that I am not following some standard, and I am not telling you to do exactly the same, maybe there is a better way of naming files that I am not aware of. The point is, you want to keep everything neatly organized, and there needs to be a way to understand what the file is about at a glance. The way I named it is also useful when I want to search a file using a program like Everything.
The directory structure should be pretty straighforward, but it changes over time, when I get more files that need to be separated into their own folders. The root directory should obviously be the name of the video game (or whatever else you're preserving: name of the website, music band, app, etc.). The folders within the root folder are based on the class of data:
- Audio: sound tracks, BGM, etc.
- Community: fan-created content (art, fanfics, etc.)
- Development: clients, servers, tools, mods, etc.
- Docs: game design docs, magazines, interviews, news coverage, etc.
- Gallery: concept art, promos, posters, wallpapers, etc.
- Video: trailers, gameplay, showcase, announcements
- Website: self-explanatory
Every directory can contain subdirectories that follow the same naming principle. Think of the scientific classification of animals, where, say, a Meerkat is an animal of kingdom Animalia, class Mammalia, family Herpestidae, genus Suricata, and species S. suricatta. In our case, Development is the kingdom; Clients, Servers, Resources, Tools are the class; Official and Unofficial are family; optionally, if there are many clients from different regions, EU, KR, JP, etc. would be the genus; and the actual file s4_full_client_2010_kr.zip is the species. So, that file would be located at:
../S4 League/Development/Clients/Official/KR/s4_full_client_2010_kr.zip
This type of structuring is self-explanatory, easy to navigate, and can even help identify possibly missing files. I will give another example of how the Gallery folder is organized, as it is one of the biggest ones:
- Aeria: assets from the publisher
- Alaplaya: assets from the publisher
- Concept Art: Art by [Artist's name], Maps, Costume Design, Weapons, Outfit promos, Artbooks, Early (prototypes)
- Features: promos of introduced features
- Launchers: screenshots of every launcher, installer, patcher, etc.
- Levels: ranks that changed over time
- Loading Screens: splash screens, game loading, map loading
- Logos: Official, Icons, Publishers, Banners, 3rd Party (Community, Pserver, etc.)
- Maps: Map promos, thumbnails, notes, official screenshots
- Modes: Mode promos
- OST: album covers, CD covers
- Other: unorganized stuff or content I yet to decide how to organize, e.g. regional based folders such as S4L Thailand, featuring assets from the Thai publisher PlayFPS
- Pmang: most of official promos were from Pmang featuring their banner
- Posters: promo illustrations with dimensions of a typical poster image
- Screenshots: official, CBT, different regions and years
- Wallpapers: any illustration with dimensions of a typical wallpaper image
Part III: Image Quality
Once you have everything collected, sorted, and organized, you're ready to analyze all of that stuff for quality to remove potential exact (!) duplicates and maybe update filenames to include additional information based on the analysis (e.g., whether the image is of high quality).
Now, there are images that might look exactly the same: same content, same dimensions, sometimes even the same size. But they can be totally different, and one of them can be of a worse quality, so don't rush believing your eyes! We will go through several examples of cases where images can at first seem to be the same, but looking closer at them will show that one is more valuable than the other. There are some pre-requisites for this stage: you need to know about file formats (at least the most common ones: JPG, PNG, GIF, and BMP).
For the first example I will show you two banners that have the same dimensions 1600x376, one file having a size of 1.10 MB (1,164,252 bytes), another one is 560 KB (573,700 bytes). Guess which one is of the better quality? If you don't know much about image analysis, you might proudly state "the one that is heavier is better!". The intuition with such thinking is that the more bytes--the "more data", and the "more data"--the higher is the quality.
But don't rush with such conclusions, because we will take a closer look to see whether this is actually true. We need proofs! We always need a proof! The first easy thing that we can try is hover over the file and see whether it will show any interesting metadata:
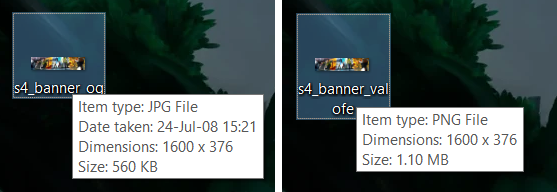
This is very interesting: the first file on the left, which is 560 KB, is a JPG image format, while the other one is PNG. If you know something about formats, then you would know that JPG image format is lossy (which means, there is loss of quality), and PNG is lossless (and it contain an additional alpha channel, which allows for the image to have transparency). But, wait, the JPG file has another interesting metadata: Date taken: 24-Jul-08 15:21. Even though the presence of that metadata does not guarantee that the file wasn't messed with, it is still valuable regardless. Let's right click on the file, choose Properties, then open the Details tab:
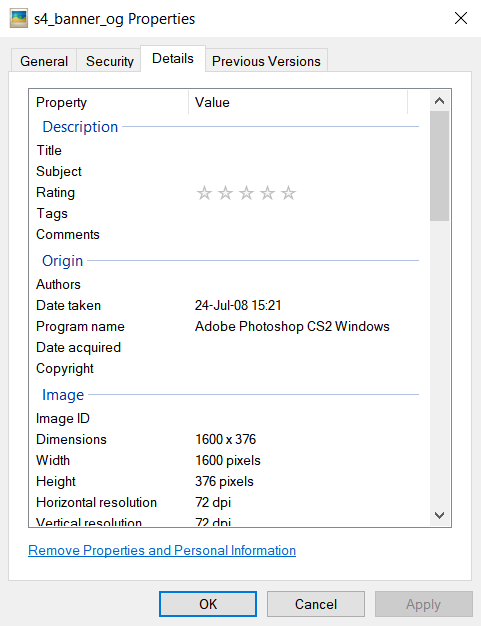
Take a look at the Origin section, where you can see Program name: Adobe Photoshop CS2 Windows. Looking at the Properties of the other file--it shows no such metadata. This file, which I already marked as "original", is straight from the Adobe Photoshop CS2 program, and I would consider it to be more valuable, unless the other one is of higher quality but with metadata being stripped. Let's look further, zooming directly into pixels:

I chose to zoom into the part of the illustration that features the sword with scratches--you can usually see the compression artifacts on these fragile elements. The image on the left side, which is called s4_banner_og.jpg has scratches looking "intact"; the image on the right is from the file called s4_banner_valofe.png, where Valofe is one of the official publishers of the game that is notorious for reviving dead games, milking players for money, and outsourcing workforce that heavily uses AI. You can clearly see that the image on the right has some scratches smudged--it's clearly suffering from lossy conversion.

But why is it heavier in size? Sometimes, it just is (say, because of PNG format artifacts or the use of AI)! And that's the lesson you have to learn from this particular example: just because the file is heavier, does not mean that it is of higher quality. This simple analysis, that did not involve using specialized image analysis software, revealed that the file with the smaller size is actually the more valuable one.
Here is another example:
If you look closely, you would see that the image on the left is slightly worse in quality than the image on the right. This is a portion of the S4 League logo on a black background. So, the first one (left) is called s4_league_01.png and it is 255 KB (261,352 bytes) in size; the second one (right) is called s4_league_02.jpg which is 58.8 KB (60,214 bytes). The case looks similar to the previous one, but hovering over images and peeking at its properties did not reveal any interesting metadata in both. We would want to take an even closer look to detect artifacts at the pixel-level:
The image on top is the JPG one. It might be hard to tell the difference when looking at the cropped versions of the images (much obvious when looking at the full image), but if you look at the shadows on the top right, you should see how the shadow on the top image goes in a straight line, while on the bottom image it slightly drifts off. That is one of artifacts of lossy conversion mentioned in the previous example earlier. What is also interesting is that, at certain points, hexagon's lines are much smoother and "cleaner" on the bottom image compared to the top image. That's because of blurriness that causes that false perception of higher quality.
One more comparison, I want you to zoom in to take a closer look at each image and see how the image on the left (s4_league_02.jpg) has a smooth glowing effect, then zoom into the second image on the right s4_league_01.png and you should notice "block-y" portions. The smaller size of the lossy format wins again!
See another example
The left image is noticeably of a worse quality because of increased blockiness compared to the image on the right where the gradient is much more consistent. When something is compressed, it loses some data; and if the compression is too harsh the loss of data can be noticeable, just like the "shadow" of the white line above is missing some color data of a pixel on the left image while on the right image the line stays intact.
This next example is really interesting, because it's unlike the previous ones: both of the images have the .PNG extension. However, they slightly differ in size: the first image is s4_neden_3_overhead_01.png and is 239 KB (244,758 bytes); the second one is s4_neden_3_overhead_02.png is 271 KB (277,891 bytes). I am going to drag and drop both files into WinMerge to see whether they are different:
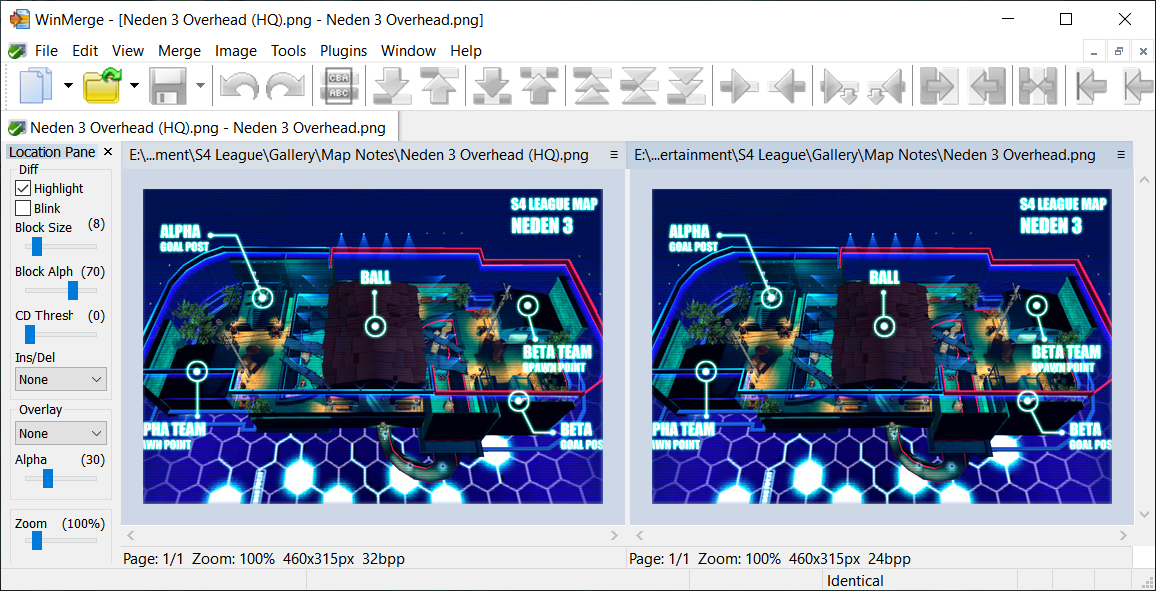
It shows they are identical. Image data might be identical, but files themselves are clearly not identical. To understand what is going on, you can open them in any hex editor program to look directly at bytes. If you're not familiar with byte analysis, then you can try using ImHex, which will automatically apply a pattern to the file so you can hover over bytes to see what those bytes represent. I am switching between both tabs and I immediately notice how some of the starting bytes in the image's header differ, particularly the 0x02/0x06 byte:
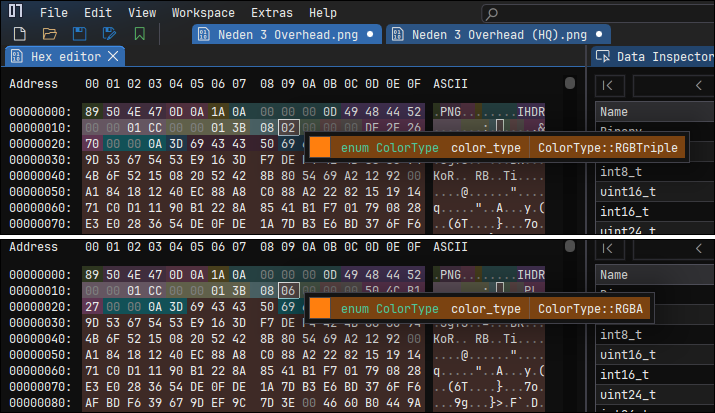
That byte represents color_type, and on the image above the value 0x02 means the color type of the image is RGBTriple, and for the 0x06 byte it's RGBA. What is the difference? You see, the PNG format is a lossless format that is known to support the alpha channel (for transparency); the A in RGBA means exactly that: Red (8 bits), Green (8 bits), Blue (8 bits), Alpha (8 bits) = 32 bits. What about the former one, RGBTriple? That one means the image does not have the alpha channel, so it's simply RGB = 8 + 8 + 8 = 24 bitss. We can look further to see other identical bytes: chromaticity (63 48 52 4D), DPI (70 48 59 73), background (62 4B 47 44); and the CRC values are different, as expected, and that's OK because even with the presence of an extra byte, the hash value will change: we already know that the extra byte is unrelated to the actual data, and it's due to the difference in format (24-bit vs 32-bit).
Even though the images are identical, the byte analysis reveals that the reason one of the images is heavier is because it has additional data related to transparency. A PNG image that supports transparency is usually more valuable than a PNG image that lacks it, but here, them being essentially identical, keep them both around, I guess. To further verify that, we will use specialized tools. In this case, we're dealing with a PNG image, so we will use pngcheck. It's a command-line utility, and I hope you know how to use those, because it will come in handy. I am running it with this command:
pngcheck.exe -v s4_neden_3_overhead_0X.png
It should generate this output:
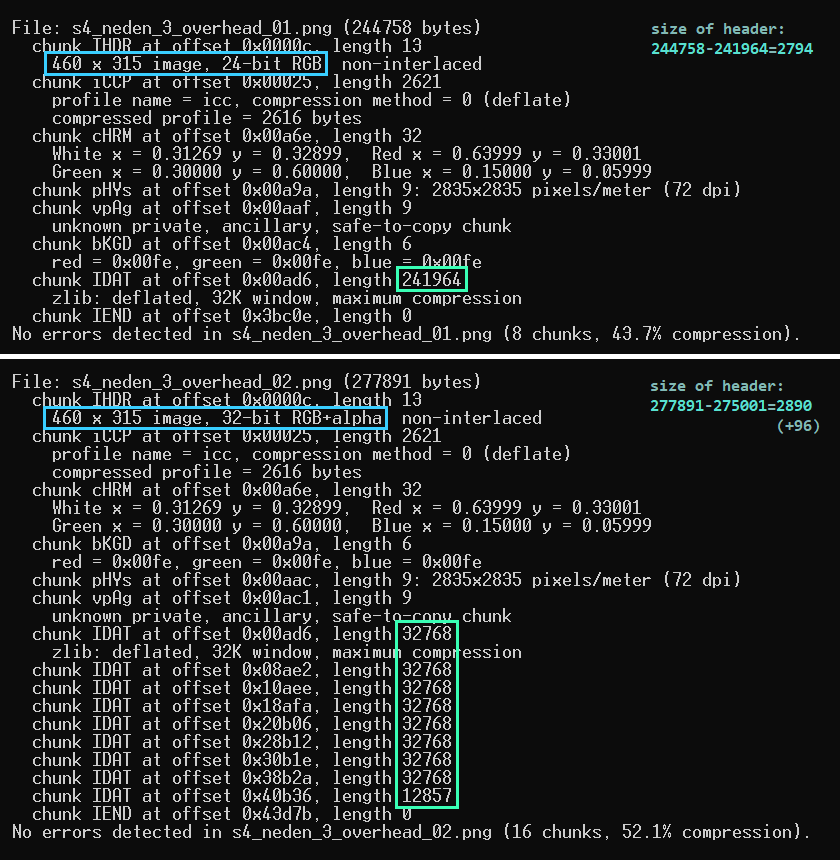
The header size matches (the additional 96 bytes come from each IDATA having additional 12 bytes of data: CRC+length+name=12*8=96). And the reason IDATA of RGBA is heavier is because of the alpha channel.
Bonus info (total pixel value vs image size)
Let's do some math: the size of the file is dictated by the amount of bytes it comprises. The dimensions of the image are 460 pixels by 315 pixels, and multiplying that gives us 144,900 pixels in total. Each pixel contains data, in our case it's either RGB (3 values: red, green, blue) or RGBA (4 values: rgb+alpha). Multiplying 144,900 * 3 gives us 434,700 total pixel data; and 144,900 * 4 = 579,600 total pixel data. The size of IDATA is almost twice smaller: 241,964 and 275,001--that's because it is already compressed (43.7% and 52.1% respectively). You could do some math to try and derive the approximate value of the original file size, but that would be irrelevant; instead, read further!
You might be wondering whether the alpha channel contains pixels that we couldn't see with our eyes (even though it was already reported to be identical). And we can verify this. For that, we will use ImageMagick. I will run it with this command:
magick identify -verbose s4_neden_3_overhead_02.png
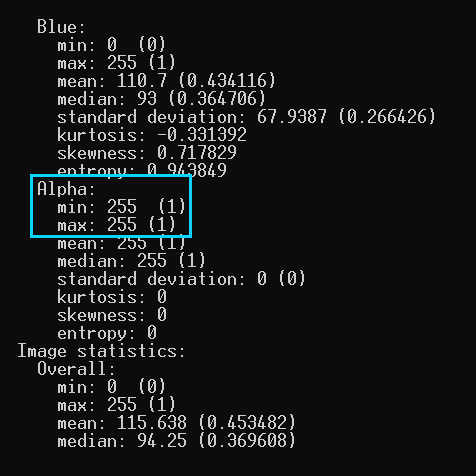
The output is pretty verbose, but we're only interested in looking at the Alpha channel's statistics, particularly the min and max values both being 255, which confirms there is NO range of data and it is fully opaque, i.e. every single pixel has the alpha value of 255. We can keep both of the images and rename them to reflect their technical details: s4_neden_3_overhead_rgb.png and s4_neden_3_overhead_rgba.png.
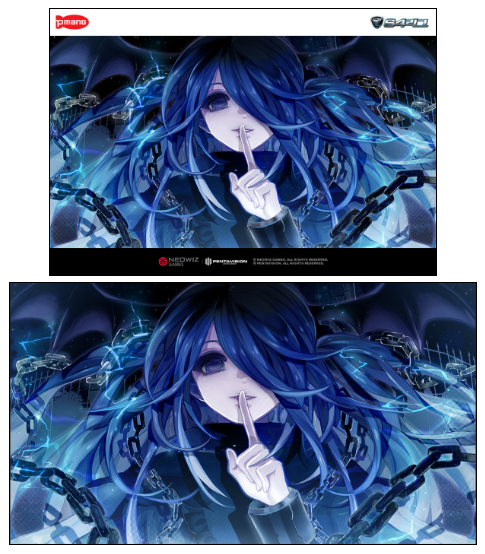
One more thing to be aware of--when the images are actually (visually) different--keep a close eye on details:

This is not a work of AI. Both of those images are official illustrations from back in a day, one of which was later reworked. I should probably give an advice on how to recognize whether the artwork is an AI slop. These particular illustrations can be found on websites that posted them a long time ago, before the AI craze, so that's the one way to know. Another way, if the artwork is a work of recent years, then there's not much that I can say right now. The way I am trying to identify the slop is by zooming into the image and looking for parts that seem weird (hallucinated): weird hands or weird amount of fingers; weird background; too many various pixels "sprayed" in certain parts (brushes are usually smooth) which are not compression artifacts, or it being "too smooth"; nonsensical details; etc.
See more examples


Part IV: Video Quality
Just like image files, video files are also coming in lossy and lossless formats. The most common and relevant video file extensions are MP4, AVI, MKV, MOV, and WMV. Now, these are containers, and unlike image file formats, the actual formats of video codecs use a different name. For example, an AVI file can use either Lagarith or HuffYUV as its codec. Lots of old videos were using this format, before the release of better codecs such as H.264/AVC, H.265/HEVC, H.266/VVC, and AV1, with common containers being MP4, WebM, and MKV.
Most of the videos you will ever archive (at least, video game related footage) will be of lossy format, which is OK. Videos are containers that can store few types of things, some of which are optional: frames, audio tracks, subtitles (some videos can be interactive, too). When analyzing a video file, you will see relevant metadata related to the video codec used, and data related to audio. Our goal is to archive any surviving footage, and as long as the video exists, all good; and even better if we can find the same video in a better quality.
First of all, we want to make sure whether the video that you have archived is scaled. That's how you'll know whether a possible duplicate of it is worth archiving. To view the videos, I am using VLC. Assuming you're also using it, let's open any video and make sure we're viewing it at original resolution: on the menu bar click on "Video", then uncheck "Always Fit Window". You will now be able to see the video at its original resolution, so it might be small or bigger than your screen's resolution.

What matters is not the resolution (I mean, it does matter, but let me elaborate) but the quality of the video: the original video could be , but it can be "crisp", i.e. not suffer from compression-resulted artifacts. Its original resolution can also be 720x480, but what you have archived could be an upscaled and re-encoded version of it at 1280x720, making it look like it's HD. There are 10-second videos of renders by 3D artists that are ~200 MB in size, and there are similarly 1 minute videos that are quarter of that. So, just like with images, the size of the video can also be tricky.
Bonus info (typical size of a lossless movie)
Movies that you're used to watch, that are mostly made in Hollywood, today are streaming online; you can also go and watch them in a theater, or--less commonly nowadays--purchase the DVD or Blu-Ray discs. Why am I mentioning Hollywood specifically? Because it actually also matters what camera is used to shoot the film: you see, a typical blockbuster can be terabytes in size in its raw format. And that is insane amount of data to store on a typical DVD or Blu-Ray or especially to stream online.
Instead, streaming services are doing their absolute best to compress without significant loss of quality and optimize the streaming pipeline to prevent latency issues. For that, you have to compress the raw data from terabytes to just gigabytes. A typical Blu-Ray movie can be 20-50 GB in size. The scene can further compress it down to 5-10 GB without significant loss of quality by using one of the modern codecs such as HEVC.
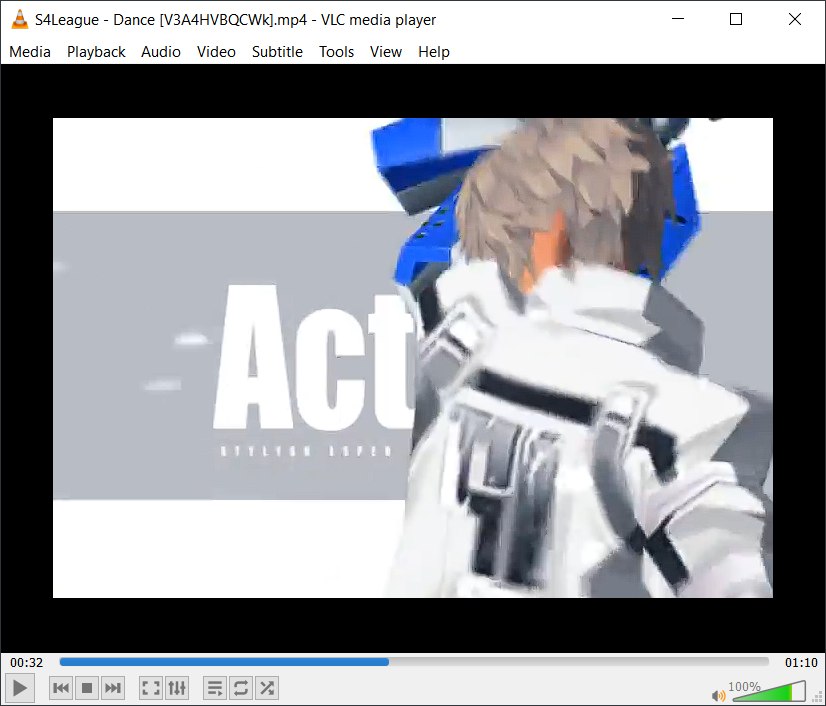
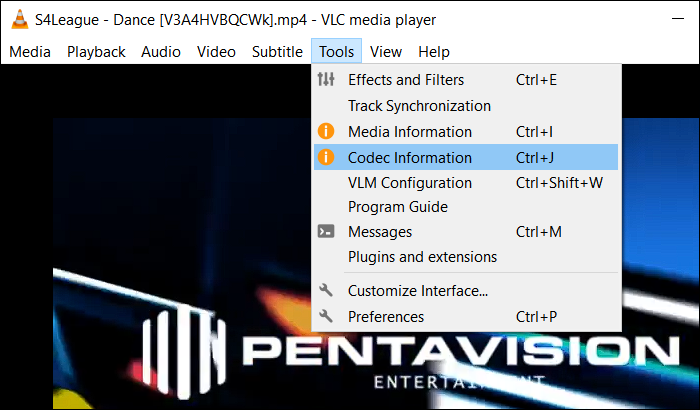
For the next example I chose one of the official promo teasers. Look at the image above--it clearly has poor quality, but I don't know if it's caused by re-encoding, perhaps it could actually be the original video released by the publisher and there is no other similar video that exists that offers better quality. I happen to have another one, directly from an official press release, and I would like to know the difference. VLC is not just useful for playing the video, but also gives us an ability to view its metadata, so let's do that: on the menu bar click on "Tools" and choose "Codec Information".
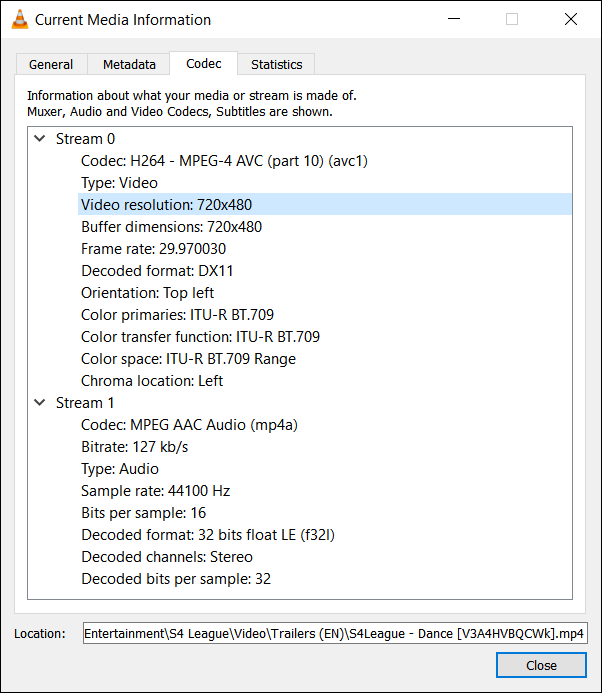
We immediately see that it's made of H.264/AVC1, 30 FPS, and an audio stream based on MP4A (typical for videos from the internet) with a sample rate of 44.1KHz. You can also browse other tabs in the same video: General tab shows... well, general information such as the title, copyright info, and info on what was used to encode the video; Metadata tab shows additional technical information about the video. Both tabs might not show anything at all. In this particular video, switching to the General tab reveals that it is Encoded by: Lavf58.29.100, which is a version of libavformat--library used by FFmpeg.
Bonus info (what is FFmpeg)
FFmpeg is an open-source multimedia tool that was originally developed by Fabrice Bellard that was later heavily improved by hundreds of developers. It's being used by every company that offers media services, including the Big Tech: it's the core of YouTube, Netflix, and Twitch streaming services, media editing applications, etc. You can use it to convert, cut, crop, re-encode videos, images, audio, capture your screen, and much more.
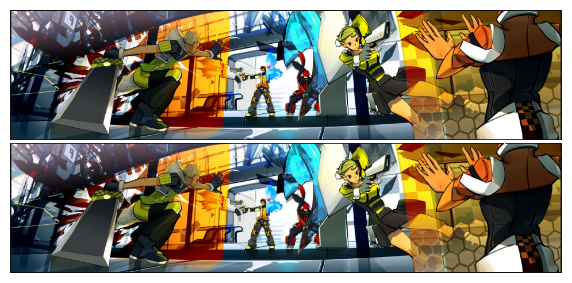
Since there are many tools that rely on FFmpeg, we will not be able to identify what is the exact source of the file, but it's clear that this library appears mostly as a result from the video being downloaded using tools such as yt-dlp. You can know that's the case if you yourself have done it (directly pulled the video from YouTube, Vimeo, or a similar service). Gladly, I have the WMV version of the file, which is an older Windows Media format commonly used by videos made on Windows back in a day. Let's play both of the videos, pause at the exact same timestamp, and use our photon receivers to compare the frames:
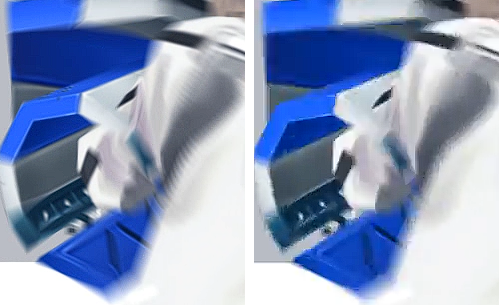
The image on the left is from the s4_dance_promo.wmv, the image on the right--s4_dance_promo.mp4. I might've chosen a bad example, but what you're looking at on those images is the arm of a character who is holding a weapon. Look at the arm having "pins" all rendered pretty well, while on the right image you can't even see them because they got blurred away. The lines are more crisp on the left image, so the video on the right is essentially a useless garbage that would only waste space (since it's not even of a higher resolution)... right?
Well, as the last check for this example we will use ffmpeg--particularly, the ffprobe.exe command-line utility that ships with it--to inspect the video files and see whether they have the exact same timestamp (we can do it just by looking at the VLC, but we can also see the more precise duration down to a fraction). We can use either of the tools (ffprobe prints more information that can come in handy):
ffprobe -v verbose -show_format -show_streams s4_dance_promo.wmv
ffmpeg -v verbose -hide_banner -i s4_dance_promo.wmv
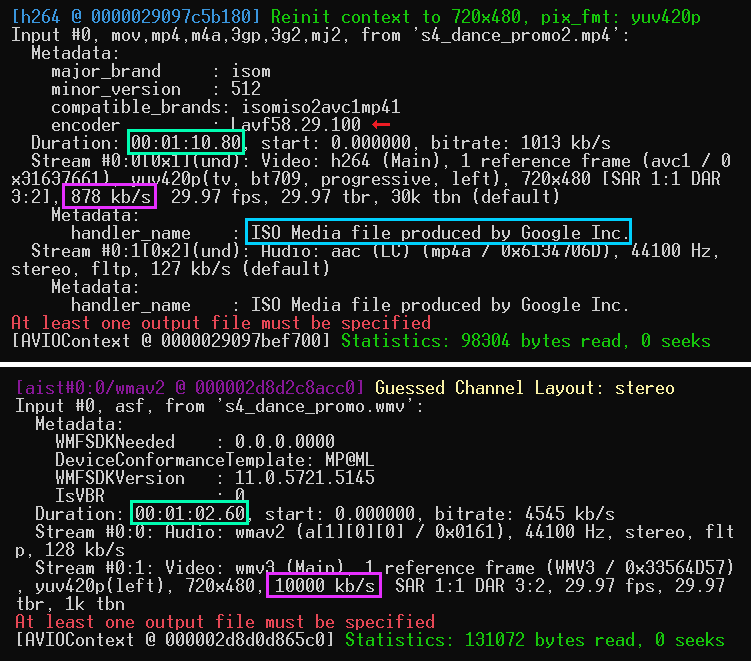
Look at the ISO Media file produced by Google Inc.--probably a YouTube artifact. And the bitrate of the MP4 video 878 kb/s is significantly lower than the bitrate of the WMV video (10,000 kb/s), which means the compression ratio is really high. Now, let's take a look at the timestamps. Wait, what? The video we called a useless garbage and were about to get rid of has additional 8 seconds! It seems to be +8 seconds right after the promo ends, and it features an ad for the OBT (Open Beta Test) of the game.

They are, after all, different videos. That's why you should remember: any file is a good file. Make sure you do a comprehensive analysis before you decide to do something graciously ridiculous that might've ended up being one of the greatest screw-ups in history of archiving (I've done this before, a long time ago, and that was a pathetic mistake).
Part V: Audio Quality
We've talked about formats and quality, so for this part the principle is the same: there are lossy and lossless audio file formats. The most common ones among lossy formats are MP3, AAC, and Ogg Vorbis (this one is most commonly used in video games). Among lossless ones are FLAC, ALAC, WAV, and AIFF. This is not to say that these are the only files you should be interested in! The whole point is to know the difference between the lossy and lossless formats. But if you see audio files that are FLAC or WAV--those are the most valuable ones, especially WAV, which represents a raw uncompressed audio file.
But. As with the previous examples, you probably already know that just because the file is of a lossless format does NOT mean that it is one. Doesn't make sense? Well, there is such a thing as transcoding--it describes a process of converting a file from one format to another. And there are times when some "genius" decides to convert a lossy format (e.g., MP3) to lossless (e.g., FLAC). That does NOT work. Once something is lossy--it remains lossy. So this is one of the things that we want to identify when analyzing audio files. We will use a very simple tool that will allow us to see the spectral analysis of an audio file. There are many programs that allow you to do that, but we don't need anything super complicated, so you can either use Sonic Visualiser or Spek. I will use Spek, because it is pretty straightforward, lightweight, and does not require an installation. All you need to do is to run the program and drag-and-drop the audio file into the program.
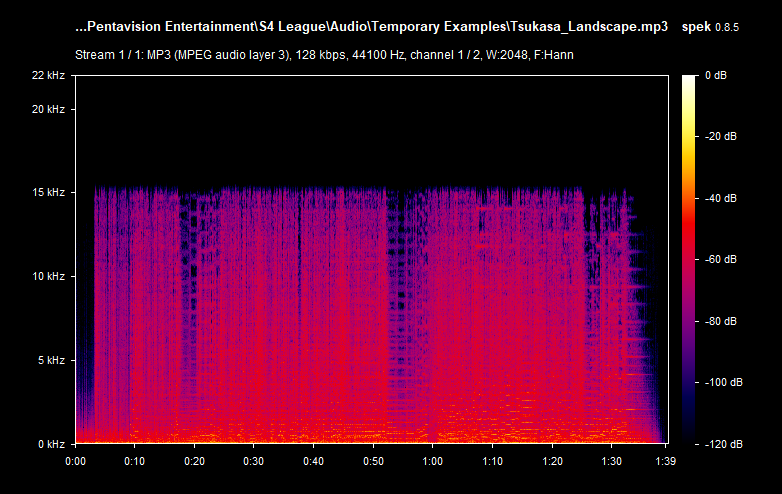
This is a random MP3 file that I already know is lossy (because of the format), but the thing about MP3 audio files is that there are actually good ones: they can also be of high and low quality. A good MP3 file has a standard bitrate of 320 kbps--this is the best MP3 quality you can get; the other common ones are 192 kbps and 128 kbps; the less common ones are anything in-between, 96 kbps, and lower than that. But these values aren't everything: there are tracks or sound effects that are low-frequency "by nature". The values that we are going to deal with are hertz that describe the frequency, and that's what we are going to look at. So the image above shows a clear cutoff at around ~15 kHz. And the text above shows that it is a 128 kbps track. The red part is the one that you hear the most, while the blue parts are quiet. Below is the table that associates the bitrate with the frequency you expect to see on the spectrum:
| Bitrate | Frequency |
|---|---|
| 320 kbps | 20 kHz |
| 256 kbps | 19 kHz |
| 192 kbps | 18 kHz |
| 128 kbps | 16 kHz |
| 96 kbps | 15 kHz |
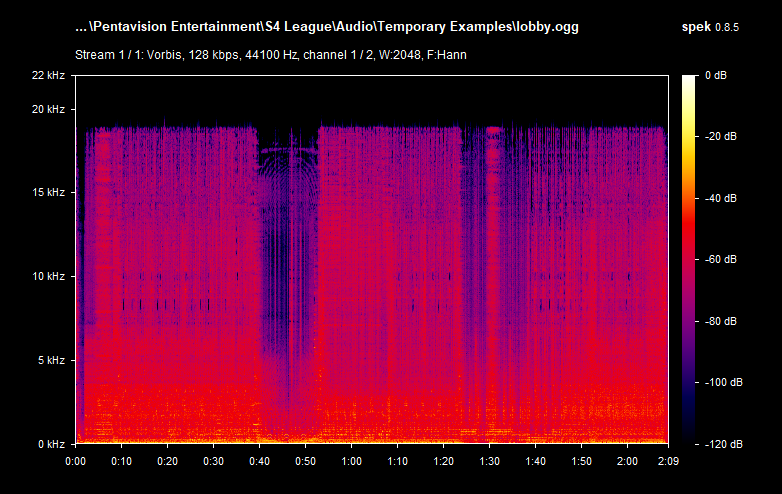
Now you can clearly see that 15 kHz is actually pretty low--not only it's a lossy MP3 file, but also with a bitrate as low as 128-96 kbps. But what is on the table is not guaranteed to be the exact 1:1 match on the spectrum--one possibility for that is it being re-encoded. As you can see, Spek reports the file to have a bitrate of 128 kbps, which is not always the reality. Please, note that this does not mean that the file is useless. In my case, this is the only version of the sound track that I have, in this particular quality, so it is worthy regardless of the quality, unless there is the same exact audio file that has the same exact content but is of higher quality (raw/lossless/higher frequency lossy). If you drag and drop a lossless audio file (e.g., WAV or FLAC) and see a similar cutoff--then it's not a real lossless audio file and it was interfered with. Here's how a typical FLAC spectrum looks like:
Compare it with the previous example of the MP3 file and the difference is staggering. This is the type of quality you're hoping for having, even though there are many other file formats that exist and every one of them is worth archiving regardless (yes, I keep repeating myself). What we want to recognize is: given two identical audio files, we need to know which one is of a better quality. For example, the files can be shipped as part of the game's client (usually in WAV or OGG format); FLAC, even though is lossless format, it is "less lossless" than the WAV format which is uncompressed (you might hear someone say it's a raw format, but it usually means that it comes with no metadata and is a pure uncompressed and un-containerized audio data). FLAC is common in digital audio distribution and ripping (which must also come with additional files--logs from EAC and a .CUE sheet--to verify the quality of the rip).
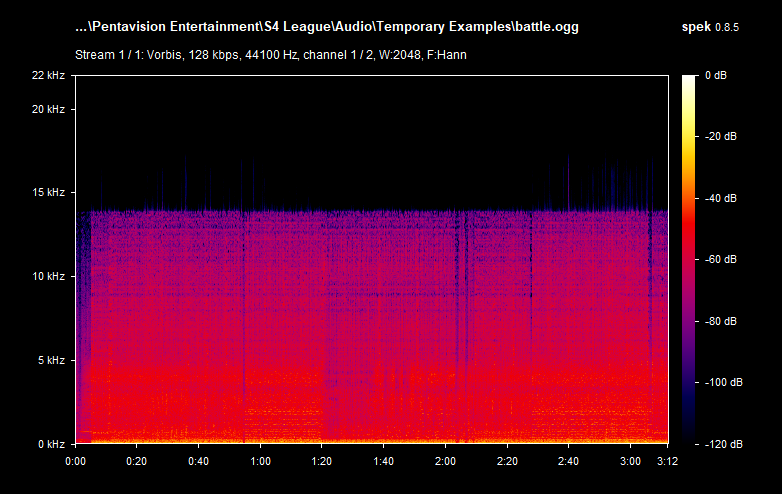
See OGG Vorbis "128 kbps" example
See MP3 320 kbps example
Going back to the MP3 example of the track Tsukasa_Landscape.mp3, we will use ffprobe to see a detailed information about that audio file. We will use this simple command:
ffprobe -i Tsukasa_Landscape.mp3
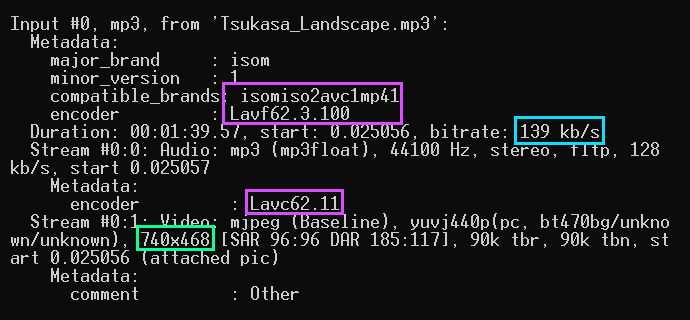
There are actually two streams present: one is the audio track, and another is an attached MJPEG which serves as the cover art with a very irregular resolution of 740x468. This, and the fact that there are traces of an MP4 FFmpeg encoder being used, strongly suggests that the source of this audio file is most likely an audio-only pull from a YouTube video. Now, let's look at the WAV example of a different track called 09 Chain Reaction.wav:
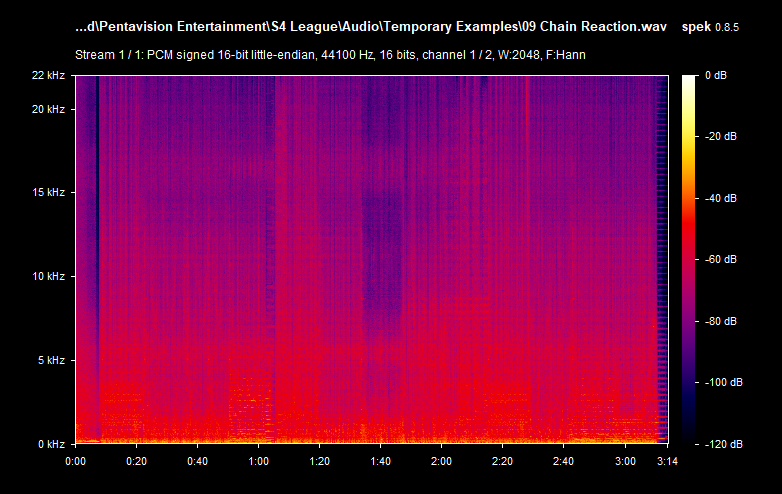

And here we see the file comes with an interesting metadata about the album: it is S4 LEAGUERS SuperSonic Limited Soundtrack which suggests that it could be a rip of this album. The page on the VGMdb shows that it comes with two discs: disc 1 with 27 tracks, and disc 2 with 2 additional files. In my archive, there are only 27 WAV tracks with the partially confirmed quality (there are no logs and .CUE), and it lacks the contents of the second disc which--per VGMdb--includes S4 League Game Client and S4 League Promotion Movie. The reported bitrate is 1411 kb/s--indicates it's uncompressed/CD quality.
Bonus info (using Sonic Visualiser)
I personally have't used this program, yet. I watched this YouTube "review" of it by Thermospore, which I recommend you to watch. It's more precise in analyzing audio files, as the spectrum allows to view separate channels. Here's more information by the author of the video from the comments section:
Thermospore: We are working with stereo audio, so there are two channels (Left and Right). The processing converts the channels from Left and Right to Mid and Side. This makes the compression artifacts easier to see, because lossy compression is typically applied to Mid and Side, not Left and Right. Furthermore, compression hits the Side channel more heavily than the Mid channel, so we especially want to pay attention to the Side channel. You can get away without doing this conversion, but it puts you at disadvantage.
As he mentioned in another comment, you can do Left/Right to Mid/Side transform using FFmpeg. Here's how you can do it:
ffmpeg -i input.wav -filter_complex "pan=stereo|c0=0.5*c0+0.5*c1|c1=0.5*c0-0.5*c1" output_ms.wav
To decode it back to stereo (M/S to L/R):
ffmpeg -i input_ms.wav -filter_complex "pan=stereo|c0=c0+c1|c1=c0-c1" output_lr.wav
Hopefully, this is enough information for you to know how to organize audio files.
Conclusion
In conclusion, I want to point out that there are many other things I did not cover in this article, so you have to be mindful about the ways you choose to handle certain files. This is mainly about the way that you can organize things you have already archived, verifying their quality. And I hope that you learned at least a bit about quality, formats, and being more attentive to details. The S4 LEAGUE Archive Team has done a good job of archiving dozens of gigabytes of material, but there are still things that we are looking for: higher quality versions of audio files, videos, and images; footages of the 2007 Korean CBT; 2007-2008 versions of the game's client; etc.
If you happen to be in possession of one of those things, please conisder contributing that stuff. If you have something to contribute, I am happy to hear from you!